How to Use the iPhone Calendar App
A Step-by-Step Guide on How to Use the Calendar App in 2026

SeniorLiving.org is supported by commissions from providers listed on our site. Read our Editorial Guidelines
Though some older adults still appreciate having a pocket calendar to keep track of their appointments, a growing number are switching to digital calendars. Apps like the iPhone Calendar make the shift pretty intuitive, since the app is modeled to look and function like a traditional calendar. Plus, since our smartphones are usually with us, it is a great tool for active seniors who need to keep track of their busy schedules on the go! You’ll be able to keep tabs on your doctor appointments, plans with friends, and visits with family all in one place.
Below, I’ll show you exactly how to use the iPhone Calendar app to create events, view your upcoming schedule, and set reminders for important events.
Downloading the iPhone Calendar App
The iPhone Calendar app should come preloaded on your iPhone. You can find it on your home screen. It will display the date and look like the image below:
iPhone Calendar App icon
If it has been deleted for some reason, no worries! You can reinstall it on your phone by visiting the App Store. Here’s how.
- Tap the App Store icon on your iPhone home screen.

The Apple App Store icon
- Type “calendar” in the search bar.

Search for the Calendar app
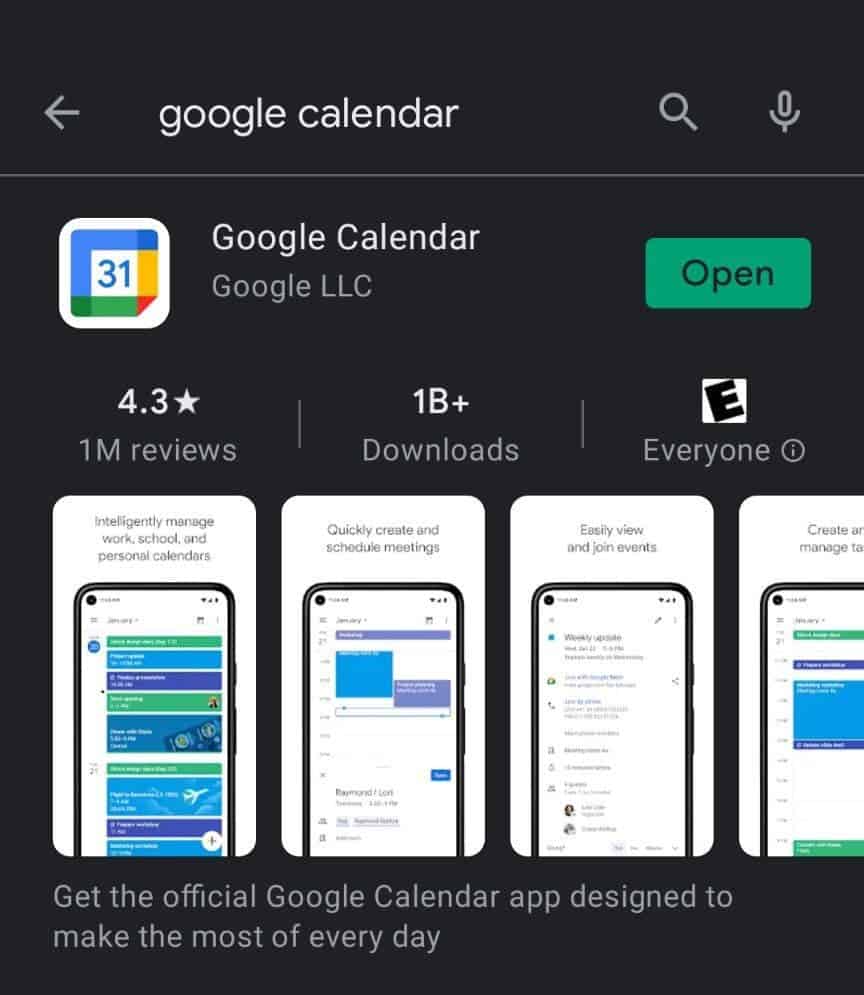
- Scroll down until you see the Calendar icon and tap “Get.” (If it is already installed on your phone, it will say “Open.” Go ahead and tap that to open the app on your phone.)
Get the Calendar App


Keep in Mind: There are many calendar apps available in the App Store. Make sure you’re downloading the iPhone Calendar app. It should have a white icon with red letters and black numbers like the one shown above.
iPhone Calendar App Views and Icons
One of the great things about the iPhone Calendar app is the five different views you can take within the app. If you want to look months ahead, or just at the week ahead, it is easy to toggle between views.
You could think of using the various calendar views as zooming in and out. You can zoom all the way out to see the entire year, and then zoom all the way in on a single day to see what’s on the schedule. Let’s start zoomed all the way in!
1. List View
When it’s handy: To see a compiled list of your events and appointments.
- To see the different calendar views, always start by tapping the iPhone Calendar icon on your home screen.
iPhone Calendar App icon
- Tap the month you want to view.
Tap Month
- Tap the day you want to view.
Tap a day
- Tap the list icon at the top of the screen. It has three dots and three lines.
Tap the list view
- This is the list view in the app. This makes it easy to see what you have on deck for the day.
List view for the day


2. Daily View
When it’s handy: To view what you have on your schedule for the day.
- Tap the month you want to view in the app.
Tap Month
- Tap the day you want to view.
Tap a day
- This is the daily view. You can see hour by hour what you have on your schedule for the day.
Day view

3. Weekly View
When it’s handy: To take a look at your week and see when you’re free or busy.
To get the most out of the weekly view, you'll want to rotate your iPhone to landscape mode. To do this, you will want to make sure your portrait orientation lock is off by opening the Control Center.
- To open the Control Center on iPhone X and later, swipe down from the top-right corner of your screen. (For iPhone SE and iPhone 8 or earlier, swipe up from the bottom edge of your screen.)
- Tap the lock button with the arrow around it. Make sure it says “Portrait Orientation Lock: Off” after you tap it.
Turn off the lock
- To close the Control Center, swipe up from the bottom of the screen or tap the screen.
- Now you’re ready for the weekly view! Start by tapping the calendar icon on your iPhone home screen.
iPhone Calendar App icon
- Tap the month you want to view.
Tap Month
- Tap the week you want to view.
Tap a day
- Rotate your phone to landscape mode, and you'll be able to view your entire week and even swipe left to see the week ahead or swipe right to look at the week before.

Horizontal weekly view


4. Monthly View
When it’s handy: To see upcoming holidays and your commitments for the month.
- In the app, tap the month you want to view.
Tap Month
- Tap the list view at the top.
Tap list view
- The gray dot on the day means there is an event to view on that day of the month. Note that some of them are preloaded holidays.
Monthly view
- Tap each day to view a list of the events.
Tap on a day to see a list of events


5. Yearly View
When it’s handy: To quickly scroll between months. You can easily see what day of the week Christmas or your birthday falls on this year!
- In the app, you can scroll up and down to view years in the past or future.
Yearly view

FYI: The iPhone Calendar app already has major U.S. holidays and observances loaded into it. So, if you’re curious about when a holiday is coming up, just take a look in your iPhone Calendar.
How to Create an Event
- In your iPhone Calendar app, tap the red plus sign in the top-right corner.
Tap the plus sign
- Tap the top box to type in the title of the event. This could be a meeting, appointment, event, etc.
Tap and write your event name
- If you like, you can also type in the location by tapping “Location.” Next, tap “Starts” to set the start time.
Add location and start time
- Using the numbers on the keyboard, type in the start time.
Type the start time
- When you’re done with that, scroll down and tap “Ends” if you would like to include an end time. Use your keyboard to type in the end time.
Tap Ends
- Scroll down and tap “Alert.”
Tap Alert
- Here, you can set when you would like the app to remind you of the event. This means your phone will make a noise reminding you of the upcoming event.
Select an alert time
- Finally, tap “Add.”
Tap add
- You should now see the event on your calendar.
Events in your calendar


How to Edit an Event
- In your calendar app, tap the event you’d like to edit.
Tap the event you'd like to edit
- Tap “Edit” in the top-right corner.
Tap Edit
- From here, you can edit the time, title, location, and alerts for the event. Don’t forget to tap “Done” in the top-right corner to save your changes!
Tap Done after editing to save changes


How to Delete an Event
- Tap the event you’d like to delete in the Calendar app.
Tap the event you'd like to delete
- Tap “Delete” at the bottom of the screen.
Deleting an event
- Then, tap “Delete Event.”
Tap Delete Event


How to Search for an Event
- Tap the magnifying glass icon at the top of the iPhone Calendar app.
Tap the magnifying glass
- Search for an event by title by typing the title in the search bar.
Type an event name in the search bar
- It will bring up all your related past and present appointments according to the word you search.
Viewing your search results
- Tap the event to view details or edit it.
View details


How to Use Siri to Create Events
If you want to forgo the typing and tapping while saving some time, Siri can schedule your appointments in your calendar for you with the sound of your voice. It’s like having your own personal assistant!
- To activate Siri, press and hold the Side button (on iPhone X and later) or Home button (on iPhone SE and iPhone 8 or earlier). Or you can simply say, “Hey, Siri.” You'll see a multicolored sphere appear at the bottom of your iPhone screen. That means Siri is listening for your direction.
Activate Siri
- Say, “Schedule coffee with William tomorrow at 7 a.m.” (insert your own event, location, date, and time here!), and Siri will schedule it.
- Next, you’ll need to say, “Confirm,” or tap “Confirm” to add it to your schedule.
Confirm Appointment


Pro Tip: Activate Siri and ask, “What’s on my calendar for today?” for a quick rundown of your day! You can even ask what's on your schedule for a certain date in the future. Check out our guide to using Siri to learn what else you can do with this voice assistant.